
How to Use Face Shape for Pixie Cut Choices
Use face shape for pixie cut choices by comparing fringe, crown height and side length, then match your preferred silhouette to texture and upkeep.
Table of Contents
I’ve written quite a bit about using face shape as a guide for choosing the right haircut. For example, I’ve written about how to use your face shape to choose between a bob and a long layered cut, or to decide whether you should go with a straight bangs style or a side-swept fringe style.
But when it comes to pixie cuts, people often seem confused about how to use their face shape to determine what kind of pixie cut they should get. So today, let’s talk about that!
First, I want to make sure that you understand that your face shape is not a test of suitability. It’s simply one factor among many in determining what kind of cut will work best for you. It can help narrow down the choices, but it won’t necessarily tell you definitively what cut you’ll end up with. That’s why it’s important to have a consultation with a professional stylist who knows your hair type, texture, growth patterns, and styling preferences. But even then, there are plenty of variations on any given style. And that’s okay! The goal is to find a style that makes you feel good, not to find the “one true” style that fits your face shape perfectly.
So let’s start by looking at the most common face shapes and see how we can adapt our choice of silhouette and finish to suit each face shape.
Oval Proportions
For someone with oval proportions (i.e., a balanced face that’s slightly longer than it is wide), the classic short pixie with crown volume would be ideal. However, if you’d rather not look so short, you could also consider a textured piecey pixie with more weight along the sides. If you’d prefer something longer, you could also try an ear-length pixie.
Longer ear-length options offer greater styling versatility. Close-cropped options, while potentially requiring minimal daily styling, may require more frequent visits to maintain the desired effect.
Round Proportions
For someone with round proportions (i.e., a round face), the general rule of thumb is to add visual length to create balance. This means keeping the crown height slightly higher than the sides, and bringing the sides closer to the head. You can also add extra visual length by adding longer wispy pieces around the face and jaw.
If you’re looking for more width through the middle, you’ll need fuller sides and a low, soft crown. For example, this can work well for someone with oblong proportions who wants more visual width.
Wider-Jaw Triangle Proportions
For someone with wider-jaw triangle proportions (i.e., a wide face), the goal is usually to emphasize the upper part of the face. To do this, keep the crown height high, and bring the sides in closer to the head. In addition, since you’ll probably want a textured look anyway, keep the texture loose and free-flowing.
Heart-Shaped Proportions
For someone with heart-shaped proportions (i.e., a forehead that’s wider than the jawline), the goal is usually to reduce emphasis on the forehead. To do this, keep the crown height lower, and bring the sides out farther from the head. You can also add additional visual length by adding longer wispy pieces around the face and jaw.
However, if you’re looking for more width through the middle, you’ll need fuller sides rather than shaved sides for less top-heavy visual balance.
Diamond Proportions
For someone with diamond proportions (i.e., a narrow forehead and chin with wide cheekbones), the goal is usually to add visual width to the forehead. You can do this by adding full or side-swept fringe. Keep in mind that the direction of the fringe will affect how much width you actually add. A side-swept fringe adds more visual width than a full front fringe. Fringe direction is governed by your preferred framing, which is discussed in more detail below.
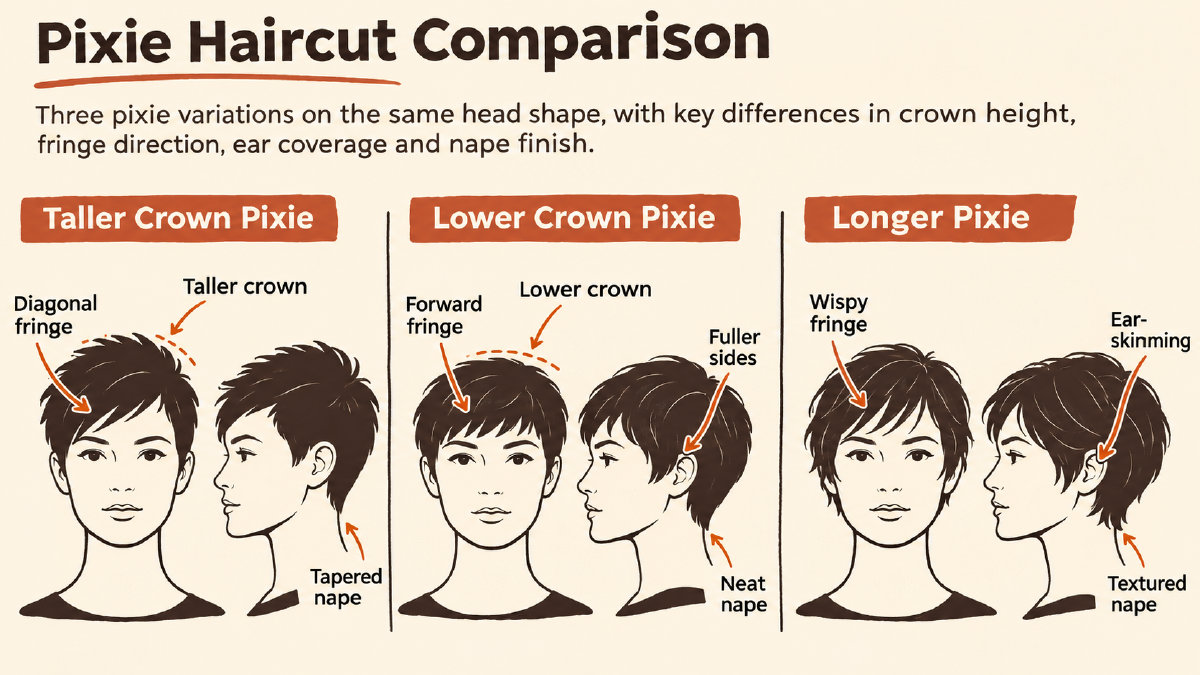
So now that we’ve gone over the basic silhouettes and finishes that work well for each face shape, let’s talk about the other factors that influence how you’ll choose your specific style.
Fringe Direction and Front Length
The direction and placement of the fringe will depend on your preferred framing. Do you want to soften angular outlines? Reduce emphasis on your forehead? Add visual width to your forehead?
If you’re trying to soften angular outlines, you’ll probably want wispy side-swept fringe and a longer pixie. If you’re trying to reduce emphasis on your forehead, you’ll probably want softer side-swept fringe that covers part of your forehead. And if you’re trying to add visual width to your forehead, you’ll probably want full or side-swept fringe.
Side-Swept Fringe
A side-swept fringe is always going to add asymmetry to your look. If you want symmetry, you’ll definitely want a full front fringe instead.
Square Proportions
For someone with square proportions (i.e., a broad forehead and/or jawline), the goal is usually to soften the angularity of the face. To do this, you’ll want wispy side-swept fringe and a longer pixie.
Heart-Shaped Proportions
For someone with heart-shaped proportions, the goal is usually to reduce emphasis on the forehead. To do this, you’ll want softer side-swept fringe that covers part of the forehead.
Diamond Proportions
For someone with diamond proportions, the goal is usually to add visual width to the forehead. To do this, you’ll want full or side-swept fringe.
Ear Coverage and Nape Finish
Of course, the front view is just one piece of the puzzle. We also need to think about how the cut looks from the back. How much coverage do you want around your ears? Will you want to have your sides cut very close to your head, or will you want them to brush against the tops of your ears? Also, do you want your nape finished off clean and sharp, or do you want it to grow out more naturally and be finished off softly?
Close-fitting sides will give a more edgy, architectural impression, while slightly longer sides brushing the tops of your ears will give a more softened, rounded impression.
And finally, the nape finish will determine whether you’ll have a polished, sharp look, or a softer, grown-out look. Clean, tapered nape will give a more polished, sharp finish, while a longer, softer nape will give a softer, grown-out impression.
So before leaving the salon, be sure to show the stylist exactly what you want. Show her pictures of what you want, and make sure she understands what you mean by “close-fitting sides,” “brushing the tops of the ears,” and “clean, tapered nape.” Don’t assume that she’ll know what you mean without being explicit. Bring a back-view picture along with your front-view picture, so she can see the ear coverage and nape finish you want too.
Texture and Growth Patterns
Now, once you’ve decided on the silhouette and finish, you’ll need to adapt the cut to your natural dry behavior. For example, if you have fine or thin hair, you’ll want a choppy texture to give the illusion of density. If you have thick hair, you’ll want internal texturizing to reduce bulk.
Also, keep in mind that your growth patterns will affect how often you’ll need to visit the salon. If you have straight hair, you’ll want soft point-cut layers for clean lines and a less helmet-like finish. If you have curly hair, you’ll want to shape around your natural curl pattern.
When you go to shampoo your hair, be sure to ask your stylist to consult with you about your curls. She’ll want to assess your curls in the natural dry state, not after you’ve shampooed and conditioned your hair. Check with her beforehand about how to prepare your hair for the appointment. During the consultation, be sure to agree on how long you want your fringe to be when your curls are fully dry. If you have a cowlick, she’ll want to assess where it is and what direction it falls before committing to a certain direction for the fringe. Ask her to show you how to recreate your chosen curl shape at home, so you can see how much daily styling you’ll need to do.
Finally, don’t forget to include possible grow-out goals into the agreed-upon pixie brief. If you plan on growing your hair out, you’ll probably want a longer pixie as a starting point. Or if you want to transition from a pixie to a bixie to a bob, you’ll probably want to reshape during your growth to support your intended transition.
You’ll probably want to schedule your next appointment before you leave the salon. Then, depending on your style goal, you’ll either come back every 4 to 6 weeks for a classic pixie, or every 6 to 8 weeks for a longer pixie. Your stylist will adjust the consultation estimates to fit your maintenance plan.
Sources
Measure your own face
Free, in your browser. Your photo is never uploaded.
- Attractiveness TestFace rating, PSL range and eye type.
- Face Symmetry TestHow evenly the two sides match.
- Jawline AnalyzerJaw angle, jaw width and chin taper.